

Clay to a Dragon: My process creating the Reading Dragon Sculpture
- protemus
- Mar 1
- 14 min read


Creating a sculpture can be one of the most rewarding and exhilarating artistic endeavors. Recently, I embarked on an exciting project: crafting a dragon sculpture that captures both power and whimsy. The process was messy at times but incredibly fulfilling. In this post, I'll share every step of my sculpting adventure—from the initial carving in clay to the final touches of painting in acrylic.
The Idea (beginning stages)

During the summer I was thinking about sculpting something for my newborn nephew. I thought a nice idea would be to make a lamp and tie it into something his father (my brother) and I were working on together. I thought a lamp was a good idea and it would be something that could be put in his room and wouldn’t just be a decoration. The Good Knight Bunny story we worked on together involves a dragon lamp which comes to life… so I thought “dragons are my thing… perfect.” So my initial idea was to make a cute baby dragon lamp that would be at home in a kid’s room. In the back of my head there was a twang of guilt because it would probably not fit at all with the baby’s room decor and I was basically forcing my sister in law to put some awful lamp sculpture in the baby’s room just because his uncle made it. But oh well. I’d just have to make it really cute and match the baby’s room. I proceeded to ask Mikey like 30 times what color you guys were painting the baby’s room… but he kept saying “I don’t know… probably something neutral. The baby isn’t going to be in there for a while anyway.” grr.
Anyway, at about that time I started sketching out the idea. I started sketching various cute dragon lamps but none of them looked very good. It was the hands. I wanted him sitting down and I wanted him to have a fat belly. And to be cute. But the hands were in the way and just putting them on the stomach looked dumb. So I thought, “why not have him reading a children’s book?” Sketched that out and it was better but still not right. Finally I settled on him reading TO the bunny from the book. The sketch here is the one I ended up basing it on. (As you can see he was still a lamp at this point)
Getting started and creating the armature

I finally got around to getting started on the Christmas present… on December 26th. I kid you not. I think at some point I realized that this would be a long process so I kept procrastinating. But then I didn’t have anything to send for a Christmas present… so I was very cross with myself.
Step one… create an armature. I wanted to really focus on the fat belly aspect so I created an armature that would help with that (and keep me from needing to use 300 lbs of clay). I also learned my lesson from previous sculptures and made sure I supported the neck with a really strong wire armature so it wouldn’t sag but I could still change the shape after I added clay without too much trouble.
The black blobs are quick hardening epoxy putty. They are there to keep the wire in place if I need to bend it and also keep the clay from slipping around the wire. The kids said if you took off the wire part it looked like a duck. 🤷
Next step: covering the armature in clay.


And then… Do some basic shape sculpting:


Ok. I skipped a few steps there… but I was on a roll sculpting so I didn’t really pause to take intermediate pictures. I sculpted the arms without armature because I knew that the hole between the belly and the arms would prevent me from being able to mold/cast it. So the arms would need to be removed and cast separately. It is tough to cut something off a sculpture when it has metal wire running through it, so I left out the armature and rested the elbows on the knees for support.
Here is where my first few mistakes happened. I made the forearms too long. And the path that I set upon to do the hands and book was a disaster (more on that later). But since there was no metal inside the arms I cut them off and reattached them shorter to fix the forearm length. They still ended up being too long for the dragon’s proportions but it ended up looking ok because the dragon is a bit exaggerated in his proportions anyway.
I also failed to take pictures of the beginning steps of sculpting the wings. Basically… I made an armature for the wings out of Styrofoam and cut the styro out with hot wire. That allowed me to have an armature that fully supported the wings and was symmetrical. I also knew I would need to mold/cast the wings separately so I made them fit into the dragon’s back by creating a divot on the back and a protrusion on the wings that slid into each other. I left exactly 1 plate’s space in the divot so I could connect the two parts with epoxy putty at the end of the process and blend the textures and add that last plate to get rid of the seam line eventually.

I sculpted the bunny separately to fit right into the dragon’s arms. As the dragon’s features evolved I started going down a more realistic path for the dragon and less children’s book “cutsie.” I thought the stuffed bunny would be a really nice contrast to the threatening looking dragon reading to him and that would give the whole piece some character. Here is the next iteration of the whole thing. It’s starting to take shape at this point.
The horns I sculpted separately out of hardening epoxy putty. That way I could embed them in the clay and not have to worry about knocking them, or being unable to get the clay out of the mold at the tips.


Up until here I was still intending to make this thing a lamp. I thought I could put a hole in the back of the neck so I could feed a pole up through and then just have a normal lamp with a shade over it. But once I got to this point I decided that the lamp thing wasn’t going to work. So now I decided that I would turn it into a night light. And the eyes would glow. During casting I would embed two glass spheres in the eyes and attach LEDs behind them that would go down inside to the base. It did occur to me that perhaps that might be a bit scary for a baby’s night light… but oh well. You could just leave the light off and never tell him that there was a mean looking dragon with glowing eyes in his room right? I did make him smiling. That’s better right?
Now for some more detail. I added the tail and started getting the plates on his back done. Then I started on the scales.
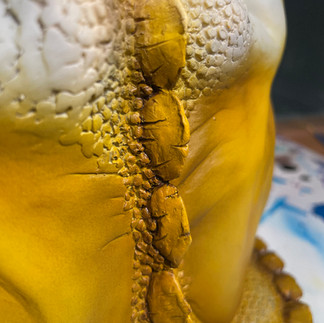
The scales were the most tedious part of doing a previous dragon I did so I really didn’t want to do that again. I tried multiple textures to get something that was easier but none of them looked very good. So I decided to dig in and carve the scales individually by hand again. This was crazy long and crazy tough and crazy back breaking and well… just plain crazy. I will NEVER EVER EVER do that again. My next dragon will have some different scale pattern… larger scales or something… or some subtle texture. With the amount of time I spent carving those scales I could have written a book… learned another language… figure out the question for the answer 42… lots of things.

Here is a closeup of the face. For hours I looked through tons of lizard, snake and gecko photos on the internet to design the pattern. I really wanted the scales on the face and under the head going to the neck to look good.
Going from the face on the left to the front scales picture below was a month of detail carving (also made some more hard epoxy nails for the feet and did the detail on those too). From Jan 17th to Feb 18th.

As you can see, I cut the hands off at this point. I didn’t take a picture of them unfortunately and I had to wreck the book to do it. I figured I could do the hands and the book separately and then cast them and put them together after… more later on how that went.
Sculpting and finishing the stuffed bunny
The stuffed bunny was pretty straightforward. I had designs from our book that I drew from for the shape of the stuffed animal and the colors. In the sculpting process I went from a chubby bunny initially to a less chubby and more proportioned bunny.

Casting the bunny was really the easiest thing I did in this whole process. I Macgyvered a container by rolling up some clear plastic and hot gluing it to my desk.


I shoved a stick into his butt and put a blob of clay as a stand… then poured silicone into it. That is the front. 😏. Then I cast, primed and painted it (mostly with the airbrush but hand painted the edges of color to color)

Eventually I created tiny buttons for his eyes to give it a bit more "stuffed animal" quality.
Some hitches in the process (lessons learned)
Ok. Here is where I made the biggest mistake. I cut the hands from the book and did all the detail carving on the hands individually. Then I cast them individually too using 2 part molds. Here is the result:

They look pretty good and they were nice clean casts. Unfortunately, the book didn’t turn out so well. I ended up taking both those hands and completely resculpting the book re-connecting them and remolding and casting the 2 hands and book as one piece together (using the 2 hands in resin and the new book in clay). I didn’t take a picture of a blank test cast or the mold, but here is a picture of the book/hands cast with some test paint on it (while I was testing out colors and painting styles):

It was actually very interesting and difficult making something that was non-organic. The book surfaces needed to be flat underneath the fingers. It took a while to understand how to make that happen. I ended up using a flat scraper to slice the surfaces at the right angle on the top and bottom and then cut out the cover edge all the way around. Then I used that same thin metal scraper to make lines in the sides to look like all the pages. I am actually rather proud of how the book came out.
Making a mold of the dragon
Now all the scale carving is done on both the body and the wings (another month later in March) and it is time to create the molds for the main dragon body and the wings.


This is the first coat of the silicone I like to call the “detail” coat. I use a brush to work the really thin silicone into all the crevices. It is thin and runs off but if I put thickener in, it won’t capture all the detail. So I pour it over the sculpture, work it in with the brush and scoop all the runoff up and pour it over again… for about 15-20 minutes. Then I let it set overnight. The result is a really thin layer of silicone that captures all the detail.

I also filled these hemispherical divots with the excess to create these keys I will use in the final stages of the silicone mold.

Then I apply 4 layers of silicone about a 8th of an inch thick each (thickened with a chemical so it spreads like peanut butter). Each layer cures for 24 hours before applying the next layer. I also added the ½ sphere divots to the base of the mold so that the mother mold has “keys” to situate itself (you can see those around the base). The result is on the left.
The idea is that eventually I will fill this floppy silicone mold from the bottom with liquid resin and then once the resin hardens, pull it off inside-out like removing a rubber glove. It sort-of worked out… but not fully like I was intending. Remember, at this point I was still hoping to put LED lights in the eyes. So hopefully I could turn most of it inside out, then put the glass spheres in the eyes and the LEDs and fill just the head with resin, locking the glass eyes in place. Then put the rest of the mold together and fill the rest… it didn’t work out like that. But it was a decent theory.
Now that the silicone is set, I needed to make the mother mold. Making the mother mold is a tricky process. The mother mold is a 2-part hard resin shell divided down the middle that goes around the floppy silicone and supports it so that the mold retains its shape during casting. Basically, you create one half of the shell and then you put vaseline on the seam and then spread on the other half. The 2 parts fit together and encase the silicone to support it.
This part I think I probably invented. I’ve never seen anyone do it this way. All the people online use large amounts of water based clay to make a wall. I actually use those cheap aerosol cans of expanding foam you get at Home Depot. I basically cover one side of the thing and then cut a clean line with an exacto knife. Then I hot-glue plastic sheets with bubbles to make the keys. The head part looked like this:


Then I spread the hardening resin paste on that side. Once it is hard, I remove all the plastic and foam and there is a clean wall with hemispherical keys in it. I cover it all with vaseline and spread the resin on the other side.

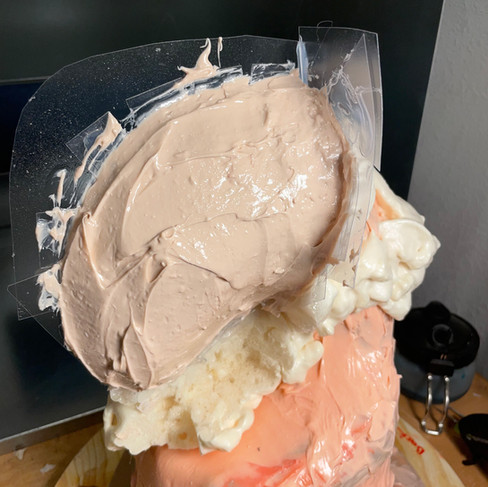


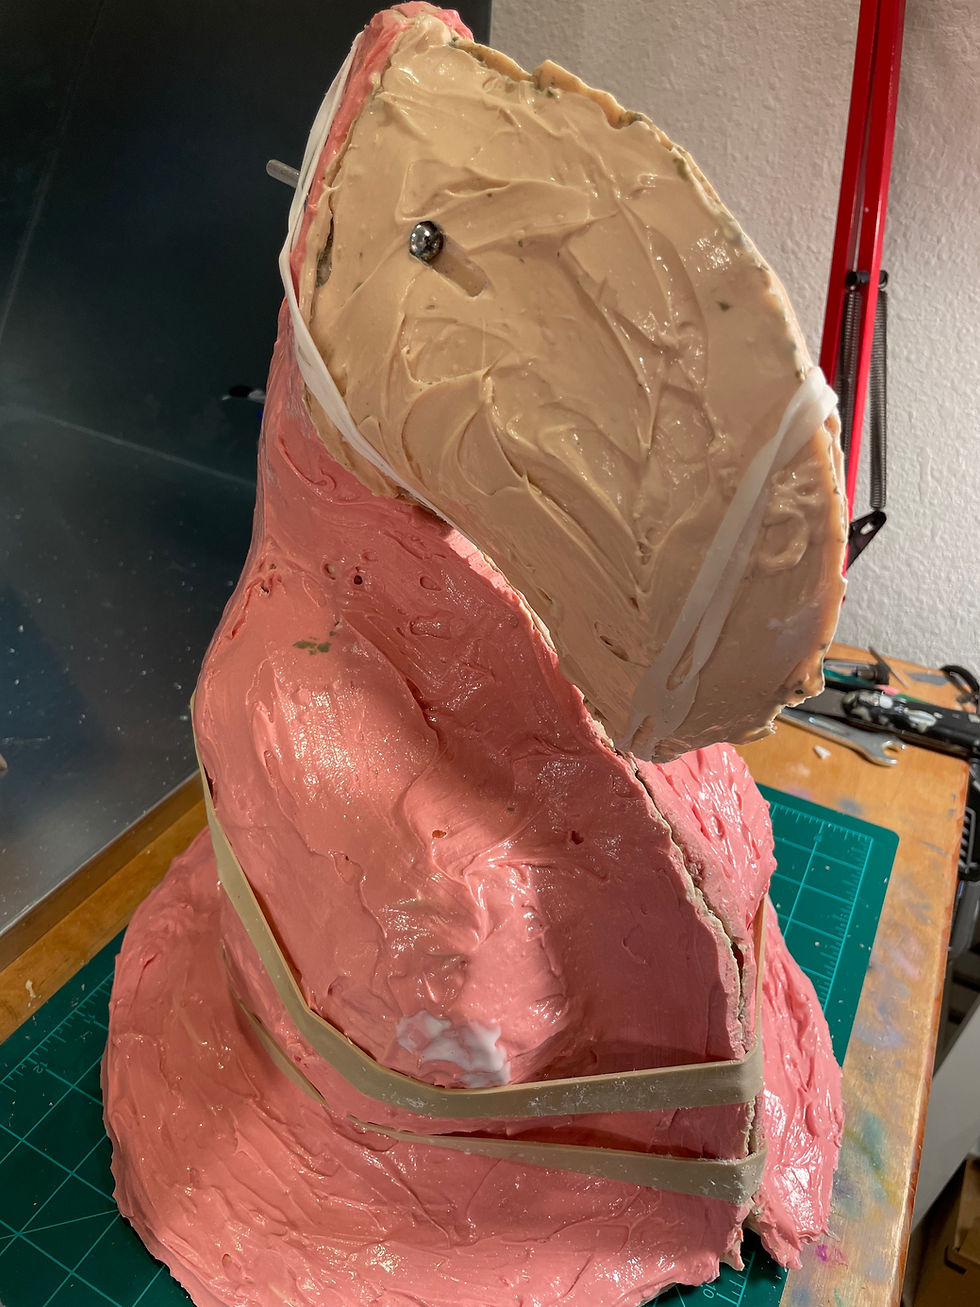
Eventually, I end up with a 2 part mother mold that can be split apart. Ignore the fact that there are actually 4 parts here (the top tan head parts and the bottom pink parts). That is because I was intending to cast the head first with the embedded eyes and then continue with the rest of the body. It did NOT work out. The neck was too thin to allow me to get in there and place the eyes. So I just screwed the 2 parts together and abandoned that idea. It would just have to be a decoration 😞.
I repeated the same process with the wings to create a mold for those. That mold ended up being 3 parts as shown here:


The pictures below show 2 things:
They show the way I embedded the screws. I drove the screws part way into the cast as I was filling it. Threaded on the screws are anchor nuts that the screws go into. Then I filled the rest of the mold with resin and let it set. The metal anchor nuts give the screws a real good purchase inside so that the threads can’t be stripped if you tighten them too much (like it could if the threads were purely resin)
The pics also show the fact that I didn’t fill the thing completely with solid resin. I filled the center with a foaming resin (because it is cheaper) then topped it off with the more expensive, heavier white resin.

At this point we are at April 21st. The molds took me about a month because of the time it takes between layers for curing and the trial and error. Now I fill the molds carefully. It takes about 11 separate pours of resin (solid around the edges and foaming in the center) for just the main body. The wings, bunny and hands also get done in separate pours.

As you can see in this picture I already attached the hands. I unfortunately didn’t take pictures of that in-process. Lining them up with the arms was a pain but I filled the space connecting the arms and hands with epoxy putty and resculpted the scales directly on the finished product in the hardening epoxy clay.
If you look carefully at the arms you can see the difference in the scales for about 1 inch in the middle of the forearms. As hard as I tried, I couldn’t get the new scales to look the same (the epoxy putty is a bit “springy” compared to the nice carve-ability of the plastiline clay the original scales were carved in). To blend it I ended up waiting until the epoxy was hard and going over all the scale lines in that 1-inch seam with a dremel to make the lines a bit sharper.
The Finishing Touches
Now for the fun part. The painting. I tried out a bunch of different color schemes for the dragon and for the book. I ended up settling on the red one. The others looked ok… but not as good as red and yellow in my opinion. Virtually all the colors are mixed because I wanted to get the right color and I didn’t have the “just right” color for almost anything straight out of the bottles.

First a base coat of yellow for the belly, wings and the plates with some brown shading airbrushed in. Then a brown wash to get in all the cracks and crevices of the plates.


A base coat of the parchment color went on the book pages front with tan/brown shading to make it look more “parchment-y”. (and a solid color for the book cover). I also did some detail washes of dark brown to bring out the pages on the sides of the book.


Then a hand painting of the red border between the yellow and red:


Cool trick… silly putty works great to mask areas so you can airbrush on color without overspray onto other areas. I used this technique all over the place to mask off parts and airbrush.


Base coats were applied on the skin and nails (masking the eyes here because I already painted them). The deep red that was airbrushed on was then highlighted with a brighter red (dry-brushed on) to really make the scale pattern pop. Detail shading with browns and cream was done on the horns and nails to make them look like bone horns and claws.


And then (after multiple layers of painters tape and silly putty and masking with bags and tape and careful spraying) most of the painting is done by June 24th.

The last painting I did was the book page art. That was freehanded with a very tiny brush and a semi-transparent brown paint. (reaching around the rest of the dragon to get in there was… interesting). I pretend wrote in english with various sentence fragments to try to make the word length and spacing look real (even though the actual writing was nonsense). I went for it with the picture on the right side… just off the top of my head with no plan. There were a couple mistakes but I think it turned out decent.
The Wooden Base
Lastly… I created the base. I cut out a square of teak butcher block and used a router to cut it into a circle using a piece of wood I picked up in hobby lobby as a template.


Then I stuck some press-and-seal to the bottom of the dragon. I marked the spot where the holes needed to be drilled, then flipped the dragon over on the base and taped the plastic wrap down. With the wrap securely attached to the base, I lifted off the dragon and Viola! The marks are visible and I just drilled holes through those marks. I spray primed it and added a stone texture using one of those orange-peel wall spray textures from home depot and then painted it gray and sealed it with spray varnish. Then I cut out a circular piece of felt to cover the bottom.
That’s it! The final touches were done on the 7th of July.
The finished project and reflections on my process
I'm very pleased with the end result of this sculpt and have come out of this process with some of the best molds I've made to date. I would have done a few things differently (the book and hands) and I developed a few new techniques (I no longer use expanding foam and instead just glue the key cards together with UV resin and paint the mother mold on without back support). But all in all, I think this went fairly smoothly. We will see just how smooth when I attempt to create more copies. I still intend to sell these but I'd have to get like a hundred copies out of these molds to actually make any money off it. My guess is I'll get no more than 20 before the molds are useless. In my head this would be a perfect decoration for a library children's section or a book store, but I realize it is doubtful I'd ever sell one of these to those types of places. I'll be happy if I just manage to get someone interested in having one of these in their home (regardless of whether I actually make any money off it).
Art for Art's sake is good enough for me!

Comments